Retraction
![]() This page is compatible with all printers.
This page is compatible with all printers.
You should
tune pressure advance first.
- Pressure advance can lower the amount of retraction needed, especially for bowden.
Table of contents
In many cases, following this tuning method is not necessary.
I usually just pick a reasonable retraction distance and just bump it up if I have issues.
-
Direct drive - Start at 0.5mm @ 35mm/s.
- Try to stay under 1mm.
-
Bowden - Start at 1mm @ 35mm/s.
- The upper limit depends on your bowden length/slack/tolerances.
- Pressure advance can significantly reduce retraction needed for bowden.
If you continue to have persistent stringing issues, it’s often caused by ![]() something else. I’d recommend reading through that section before continuing with the tuning towers.
something else. I’d recommend reading through that section before continuing with the tuning towers.
If You Are Having Persistent Stringing Issues
-
Ensure that your filament is dry. Wet filament can cause near-unfixable stringing.
- Even brand new, factory sealed filament can still come wet.
- Ensure that you don’t have excessive backlash in your extruder gears.
- With Bowden extruders, make sure that the bowden tubes are not moving too much in the fittings.
- You can stick a piece of tape on the tube near the fitting and see if it moves in and out during printing.
- Ensure that your nozzle is relatively clean.
- Ensure that your hotend is not leaking around the threads or heat break. This can indicate that your nozzle or heatbreak is loose or not making adequate contact.
- Your nozzle should be hot tightened (to the manufacturer’s recommended torque specification if possible).
- On most hotends (particularly ones without a free-floating heater block like the v6 & Dragonfly), the nozzle should not be “bottomed out” against the heater block. You should see a little bit of a gap/thread. If the nozzle is bottomed out, that means that the heatbreak is not screwed in far enough and is not making adequate contact.
- You may need to use less z hop (z lift). I run 0.2mm. Much higher than 0.3mm gives me stringing.
- Your retraction/unretraction speeds may be too fast (or too slow - but anecdotally I have had better results with slower speeds, around 30mm/s).
- Make sure you are not overextruding. Tuning article here.
- Try extruding and then retracting (with the e motor off) by turning the extruder by hand. There shouldn’t be too much of a “dead zone” when reversing directions. This could indicate too much backlash, a loose grub screw, or another extruder issue.
- Your pressure advance may be too low.
- Try a new nozzle.
- If all else fails, rebuild your extruder/toolhead.
With PETG
If you’re using PETG, you may just need to live with some stringing.
PETG is extremely difficult to get string-free prints with.
- Well-tuned PA/EM helps.
- You may need to tinker with temps and cooling.
- Use avoid_crossing_perimeters in PS/SS or combing in Cura.
- This keeps travels/stringing inside the infill where possible.
- It increases slicing and print times, however, so there’s no need to keep it on for other materials.
-
E3D Nozzle X has a nonstick coating that might help, however I have not tested this theory.
- If you try it, let me know. I’m curious.
Method
If you typically print with z-hop, leave it on for this test.*
* Don’t go overboard or it will cause more stringing. 0.2mm-0.3mm is usually enough.
There is some trial and error involved. You may need to re-run these tests at varying retraction speeds and temperatures if you are not getting good results. You will just have to experiment. You should hot tighten your nozzle (unless it’s an E3D Revo).
There are a few factors that can affect your retraction settings, such as:
- Material type
- Print temperature
- Hotend
- Extruder
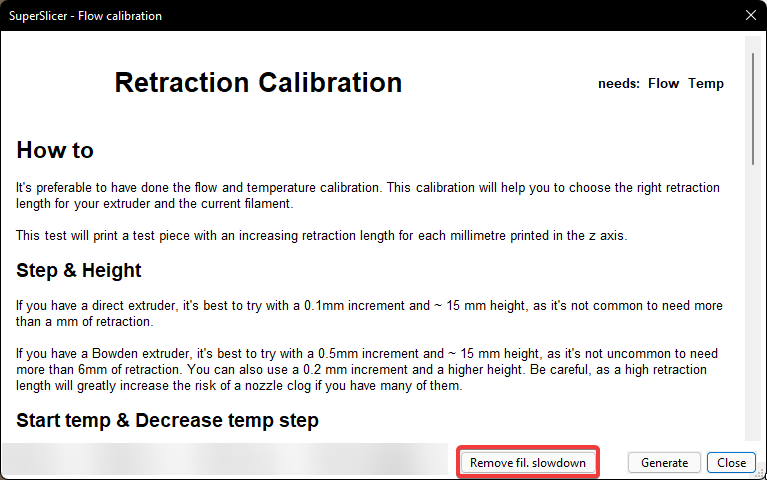
We will be using using ![]() SuperSlicer’s calibration tools.
SuperSlicer’s calibration tools.
-
If you do not typically use SuperSlicer, you can start with one of the built-in Voron profiles or use one of my
my profiles (please read the manual, though.).- The built-in profiles are not great in my opinion, but will work fine just for running the calibration tools.
We will be printing these retraction towers at three different temperatures. If you are confident that your filament temperature is well tuned, you may get good results with just one tower.
-
Ensure that your nozzle is clean. You can use a brass brush while it is heated.
- Set your fan speed high.
- These are small towers, we don’t want them to get melty.
- These are located in the “filament settings” tab, under “cooling”.
- Try 80-100%.
- Set your retract and unretract speeds to 30mm/s to start.
- This is located in the “printer settings” tab, under “extruder 1”.
- I have had more luck with slower retraction speeds. Your mileage may vary.
-
Select “extruder retraction calibration” from the menu.
-
Click “remove fil. slowdown”.
-
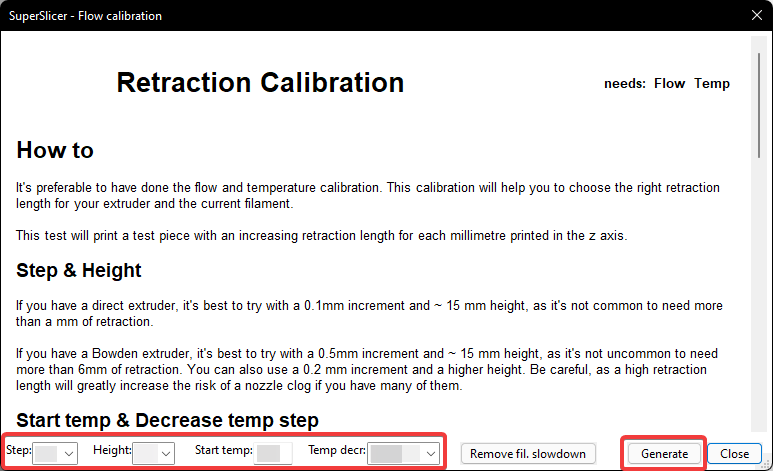
Fill out the parameters and select “Generate”.
-
-
Start temp:
- Set a bit higher than your normal printing temps (maybe around 10C higher).
- For this example, I will be using 255C with KVP ABS.
- Set a bit higher than your normal printing temps (maybe around 10C higher).
-
Step:
- Direct drive: 0.1mm
- Bowden: 0.5mm
-
Height:
- Your maximum retraction length will be (height - 1) * step.
- Do not exceed 1mm for direct drive.
(height: 11 when using a step of 0.1mm)- You will rarely need more than this, but it is possible with some high flow hotends and setups. Start with 1mm, only go up to an absolute max of 2mm if required.
- For bowden, this can vary. Try starting with a maximum of 3mm.
(height: 7 when using a step of 0.5mm)- You may need more, depending on a few factors like pressure advance, bowden tube length, bowden tube internal diameter, and how firmly attached the tube is in the couplings.
- Ensure that your bowden tubes are as firmly attached as possible, and do not move too much in and out of their couplings during printing.
- (This is just to show the movement, I’m not suggesting the fix shown in that video)
- Do not exceed 1mm for direct drive.
- Your maximum retraction length will be (height - 1) * step.
-
Temp decrease (temp decr):
-
3x10°.
- This will print three retraction towers. One will be at your “start temp”, the other two will be 10C increments below this.
-
3x10°.
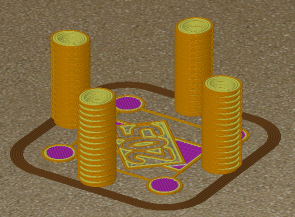
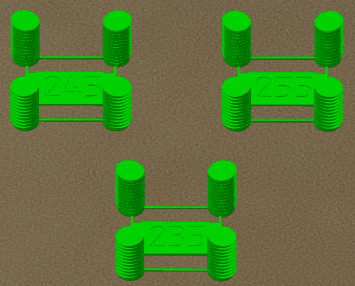
- You should get output like this:
-
 If you get this misalignment, temporarily set
 init_z_rotateback to 0.
-
Start temp:
-
- Arrange the towers front to back* on your build plate.
- These objects are printed one at a time. This ensures that they are not knocked over by the gantry/toolhead.
- Arrange them from the hottest tower at the front, to coolest tower at the back.
- The towers are printed from hottest to coldest. This just lowers the chance of collisions (particularly with poorly written
PRINT_ENDmacros).
- The towers are printed from hottest to coldest. This just lowers the chance of collisions (particularly with poorly written
-
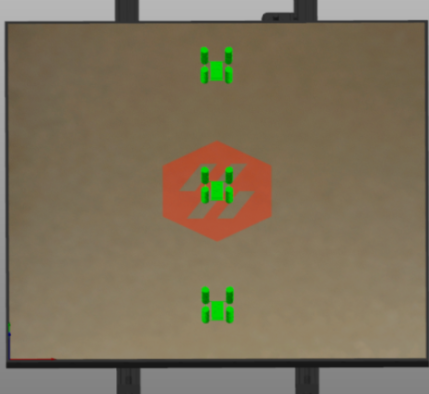
* If you are using a different kinematic system than CoreXY/i3 cartesian, you may need to use a different arrangement. For example, a cross gantry would need diagonal.
- Print it, and inspect the results.
- If your hotter towers are much stringier, consider choosing a lower extrusion temperature.
-
To get your new retraction length:
- Count the rings (from the bottom), subtract 1, and multiply by your “step” value from step 6.
- In my opinion, choose a height 1-2 rings higher than where the stringing disappears. This just gives you a bit more headroom for filaments that may behave a bit differently.
- We are subtracting 1 because the first ring is 0 retraction.
- Count the rings (from the bottom), subtract 1, and multiply by your “step” value from step 6.